KBR Horse Training Information

Exercising Body AND Mind

Rope Halters, Leads and
Related Equipment

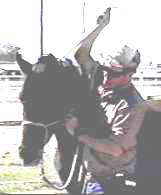
When working with horses which are young and inexperienced, gentling an adopted wild horse or working with a horse who displays behavior problems, it is of utmost importance to use the right equipment. Even with well broke horses, using the right equipment makes handling horses safer, more predictable and easier on both horse and handler. This information sheet is devoted to discussing rope halters.

A halter can have a great deal more purpose than merely attaching a horse to a rope. It is a primary means of communicating with the horse when handling him from the ground. Yet, I see time and again people using web or leather halters, padding them so that they will be comfy, then running for a stud chain when they want the horse to do anything. There IS a better way!

Let's consider the purpose of any device which we use on a horse:

  1. It needs to convey a message.

  2. That message needs to be clear and not include a bunch of "background noise".

  3. It needs to be safe for both horse and handler

  4. It needs to be both durable and reliable

We have used just about every halter there is and there is nothing which we have found that comes anywhere near the effectiveness and usefulness of a hand tied marine grade kernmantle braid rope halter and lead rope. The halter is humane in that it won't cut the horse, yet the horse can clearly feel it and the "message" the handler is sending through it. It doesn't get stiff, won't break, and can be thrown in the washing machine when dirty. The same material in a lead rope or "horse handling" rope won't kink, doesn't easily "burn" the hands (although any rope can under the right set of circumstances), has a great weight and feel to it, and is similarly "maintenance free." We have used these items for years on everything up to and including draft horses and we've yet to wear one out.

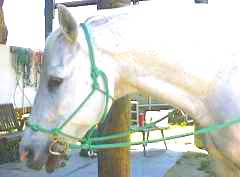
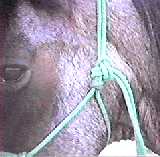
The rope halter itself is light and pliable so that it conforms to the horse in such a way that it can make very effective contact without hurting the animal. It has single strands along the cheekbones and double strands across the poll and nose so if the horse pulls or "makes contact", he will feel the greater contact without getting cut. The surface of the rope is smooth and soft enough so that when properly put on, the horse should not ever rub sores into himself (although I have seen a couple of very committed "halter pullers" rub some very minor sores on the sides of their lips before they gave up fighting the halter.)

  TRAINING WITH THE HALTER

While details surrounding the various training methods. and reasoning behind them, will be discussed in detail on separate information sheets (which can be viewed by clicking on the subject titles below), here is a brief overview of some principal training uses for the halter.

  • Backing the horse down the lead rope - This drill is of immense importance since it is one of the few ways you can keep your horse from crowding you when leading him, especially when he gets nervous. The contact of the rope halter is "clear" enough that with some simple training, just a light shake of the lead rope will cause the horse to give you the separation you need for safety.

  • Bending and suppling - The position of the knots on the nose make it very desirable on the part of the horse to bend to you when you ask, which is not only important for getting the horses neck and shoulders "unlocked", but also for teaching disengagement (a real important safety issue).

  • Following on cue - When teaching your horse to "walk up" or "step up" when you ask, the double strand behind the poll makes good and clear contact so that your horse should respond to you when you issue a "light" request.

  • Tying - Particularly with young horses and ingrained halter pullers, you need to set up a situation where the horse can pull and not liberate himself, thereby reinforcing the bad habit, yet not hurt himself. The rope halter has no metal parts to break or cut the horse, if made with the proper materials, it will resist "burning" the horse, and when PROPERLY TIED (key point here!) the horse should be able to pull and not hurt himself. (You need to know what you are doing when dealing with chronic halter pullers, but you also need the right equipment!)

  • Trailering - The rope halter can't twist and cut a cheek bone like the brass on some web halters can if the horse staggers while being trailered, however a lead attached to a rope halter should always be attached to a friction or emergency break-away device.

  • Round penning - The rope halter facilitates numerous maneuvers while the horse is both "on the line" and "at liberty".

(We use rope halters for many purposes so this list is far from complete.)

  PUTTING THE HALTER ON THE HORSE

Haltering your horse is an important first step to whatever it is you plan to do. Do a bad job of haltering, and your horse will be more likely to be irritable. Place the halter on correctly and politely, and your horse will likely start out with a better attitude.

It never ceases to amaze me the number of times I see people complain about their "high headed" horses, yet darn near everything that they do around the horse sends the poor animal's head up toward the sky. They often feel compelled to "fix" the problem by attaching a stud chain and hurting the horse's nose. There REALLY IS a better way.

(The basic principles applied here work with rope, leather or nylon web halters.)
  1. Approach the horse at the left shoulder. (Most halters are designed to be installed from the "on" or left hand side.) Place the halter in your left hand and show it to the horse. You can either lay the lead rope across your other arm or rest it across the horse's withers.

  2. With your right arm, reach OVER the horse's neck and down the "off" or right hand side. You are now more or less hugging your horse. DO NOT stick the horse's nose in the halter and flip the poll strap up over his head. People do this all the time and the upward motion going past the eye naturally sends the horse's head up in the air. While many horses learn to "tune out" this improper motion, why would you want to send your horse ANY conflicting signals? Besides, at some point you may need your horse to move his head up and away from you, so why would you want to teach him to ignore this aid simply through poor haltering practices? We always work with a DOWNWARD motion whenever possible around the horse's head

  3. Once you have reached down with your right hand you can take the end of the poll strap and bring it over the horse's neck. (Please note that I am exaggerating the movement here for purposes of illustration.) If the horse wants to leave, you now have material completely around the horse's neck so that you can control him.

    KEY POINT: With the poll strap in your right hand and the left side of the nose band in your left hand, gently slip the halter up the horse's nose and in one smooth motion and secure the poll strap. Most horses not only don't mind this procedure, but many will actually naturally turn their noses toward you to make the process easier.

Show it
Reach for it
Draw it up

When tying a rope halter, especially on horses that don't have bridle paths, give the halter a few seconds to "relax" after first putting it on. It may need to be taken up slightly in the event the nose band settles too close to the horse's sensitive nose capsule. Using the latch knot (below) it's a simple process to readjust the halter.

I've had a couple of ladies complain that they were too short to halter their horses. Using this method, I have walked up to their horses on my knees, put my hand on the horses' withers, and when they lowered their heads, easily put the halters on. (This stunt was to illustrate a point and is not something we recommend that you do.)

How low can horses lower their heads? No lower than the point at which their lips touch the ground.

  TYING THE POLL STRAP

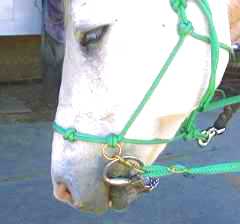
There is a little secret to tying the poll strap so that it can be easily loosened if the horse pulls. Draw the poll strap down through the halter eye. Bring it down, to the rear of and around the eye, then across the front of the eye and tuck it through itself. This may sound complicated, but it's really pretty easy. The idea here is NEVER to tie the poll strap up around itself because the knot could cinch tight under pressure and be very difficult to remove. By tying around the eye of the halter, you can always slide the eye back up to loosen things if the horse pulls and the knot gets tight.

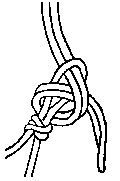
Pat Fredrickson, who makes and sells high quality hand made rope halters has so kindly provided this illustration which better shows you how to tie the halter. This knot is known as the "latch knot." You can find Pat's halters and leads at Natural Horse Halters. If you prefer Parelli halters and leads, they can be found at Shopworks.Com.

Other trainers and suppliers also provide rope halters, but be sure to get soft, pliable marine grade kernmantle rope halters as they resist UV, moisture and sweat without getting stiff and nasty.

This knot ties the same way as a sheet bend, illustrated at the
Brighton (UK) Boy Scout site.

Edit, info added: Warwick Schiller produced a good, short video that illustrates the key points in the proper application of rope halters. It can be viewed Here.

  SIDE PULL MODIFICATIONS

For bridle shy horses, youngsters who don't have long enough teeth to bit, mouth sore horses, or just for fun, the rope halter can be fashioned into an effective "side pull" by merely inserting small iron rings in the side knots when the halter is made. Reins can then be attached to these rings for riding. (We usually start youngsters in the side pull along with a headstall, letting them "carry" the snaffle bit, reading the cues from the side-pull halter. We will transition to the snaffle by riding for a couple of days with four reins where we will gradually decrease pressure on the side pull and increase pressure on the bit.)

Can be used with or without bit
(Shown with bit)

Rigged so halter is main contact
Rigged so bit is main contact

  CLARITY VERSUS SEVERITY

(Taking out the soap box...) One thing about this business really bugs me. People often times use poor methods or equipment and when they don't work, go about looking for something more severe. I liken this approach to the old weather beaten radio speakers in my truck. They didn't do the job, especially with engine and road noise present, and no matter how loud and irritating I turned up the radio, I would have still had difficulty understanding the announcer, if I understood him at all!

If I went out and bought a new set of speakers which I could CLEARLY understand, What a difference it would make! I could pick the message out of the "background noise" and the experience would be much more pleasant.

The same thing goes for your horse handling equipment. Severity and clarity are NOT the same. A device that sends a clear message usually gets the job done well. Do you want to just turn up the volume, or do you want to send a clearer message? It's your call!

We have found a good selection of soft yacht rope available at
West Marine, a national boat supply chain.

(Putting away the soap box...) Good luck and try to think about sensible, not artificial, solutions!

  Here are a couple of
"How to Tie a Halter" Links

"Tie a First Class Halter"

"Tie a First Class Halter with a Fiador Knot"

Please note: The author in these links suggests using a thin rope for good control. Our experience is that soft 3/8 in. marine grade kernmantle yacht rope is not as severe as thin rope and accomplishes as much if not more than the thinner material. Some horses are pretty sensitive and thin rope can overstimulate them.

Dan Morrison, who sent us these links says, "It was pretty hard the first time, but it gets easier, and it is good therapy." (Our experience was the same.)

Thanks, Dan!

Continue to: A Proper Horse Handling Rope


Press "Back" to return to the page that brought you here

Go to Case Study Section

Return to Training Section

Return to Wild Horse Mentors

Return to KBR World of Wild Horses and Burros

Go To KBR Horse Net


KBR Horse Training Information, © 1997 Lamm's Kickin' Back Ranch and Willis & Sharon Lamm. All rights reserved. Duplication of any of this material for commercial use is prohibited without express written permission. This prohibition is not intended to extend to personal non-commercial use, including sharing with others for safety and learning purposes, provided this copyright notice is attached.
Email us to submit comments or request reproduction permission.